+86-186-0272-9625 support@em-smart.com

Views: 499 Author: Site Editor Publish Time: 2023-04-01 Origin: Site

Introduction to LightBurn
LightBurn is a powerful and intuitive laser control software that allows users to create and edit designs, as well as control laser cutters and engravers from a variety of manufacturers. It is compatible with a wide range of laser types, including CO2, fiber, and Galvo lasers, and offers a range of features and tools for creating precise and detailed laser cuts and engravings. With its user-friendly interface and advanced capabilities, LightBurn is a popular choice for hobbyists, artists, and professionals alike who want to take their laser cutting and engraving projects to the next level.
As a versatile laser control software, LightBurn is designed to be compatible with a range of different operating systems, including Windows, Mac, and Linux. This means that users can choose the platform that best suits their needs and preferences, without having to worry about whether LightBurn will be compatible with their chosen system. LightBurn offers a native application for each of these systems, so users can enjoy a seamless experience with a user interface that is optimized for their specific operating system. Additionally, LightBurn regularly releases updates and bug fixes for each of these platforms to ensure optimal performance and compatibility.
Download and Install LightBurn
1. Go to the LightBurn website (https://lightburnsoftware.com/).
2. Click on the “Download” button at the top of the page.
3. Select the version of LightBurn that is compatible with your operating system (Windows, Mac, or Linux).
4. Once the download is complete, open the LightBurn installer.
5. Follow the prompts in the installer to install LightBurn on your computer. During the installation process, you may be prompted to choose the location where you want LightBurn to be installed and whether you want to create shortcuts on your desktop or in your Start menu.
6. Once the installation is complete, launch LightBurn by double-clicking on the desktop icon or opening it from the Start menu.
7. If this is your first time using LightBurn, you will be prompted to enter your license key. If you don’t have a license key yet, you can use LightBurn in trial mode for up to 30 days.
8. Once you have entered your license key or started the trial, you can begin using LightBurn to control your laser cutter or engraver.
Installing The Driver (Windows only)
When installing LightBurn, the last screen of the installer has a set of tick boxes to install additional drivers needed for certain types of machines. We’ll need to add the “EzCad2 driver” used by galvos before LightBurn can see the galvo you’re trying to set up.
If during initial installation you didn’t tick this box, you can simply run the installer again, and select this box to ensure the driver is installed for use. Windows will prompt you for permissions escalation to install it, and quickly replace the driver provided by default with one LightBurn can use to communicate with your galvo-based laser.
Alternately, the installer for the driver is in the LightBurn files at “C:\Program Files\LightBurn\EzCad2Driver\” and can be run again via the “dpinst-x64.exe” file directly.

Adding & Setting Up Your EM-Smart Laser
To set up and configure your EM-Smart laser, you’ll need to create a new device, and manually enter settings provided by EM-Smart Laser.
To add a new device LightBurn, click the ‘Devices’ button.

Click ‘Find my Laser’ and LightBurn should detect the JCZ controller and add it for you.

You’ll need to enter the specific work area dimensions (the size of your workspace, usually 110*110mm or 150*150mm)

It’s also a good idea to set up a new device profile if you have more than one lens for your EM-Smart, because changing lenses will affect many parameters. You can duplicate a device after setting it up by right clicking on it in the ‘Devices’ window and choosing ‘Duplicate’. This is the easiest way to add a new profile while keeping the settings, so you only have to update parameters that change with the lens.

Select JCZFiber, click Next, and choose ‘USB’.
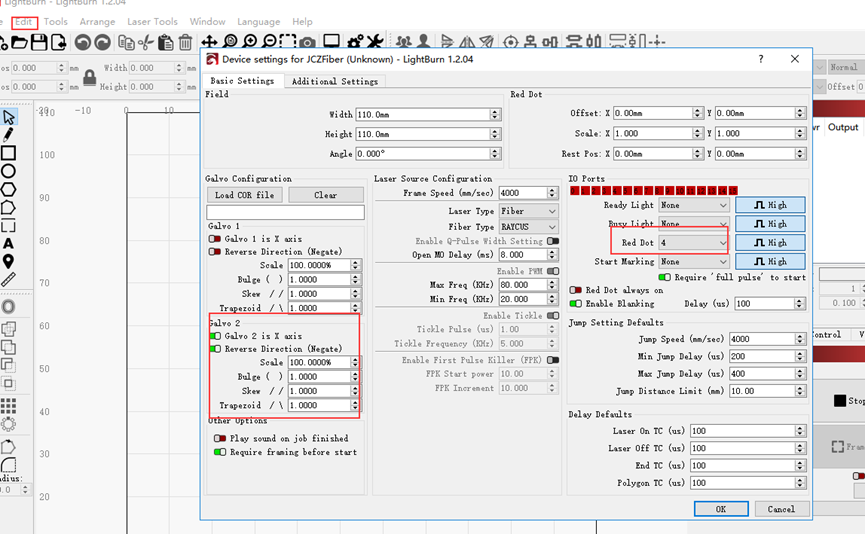
When in the main window, please open the “Edit” menu item, and select “Device Settings”. Now enter settings such as Field, Galvo, IP Ports etc. for your EM-Smart laser.
How to Switch Back to EZCAD from LightBurn?
Restoring the Driver
In the event you want to use EZCAD it’s a simple task to revert to the original driver.
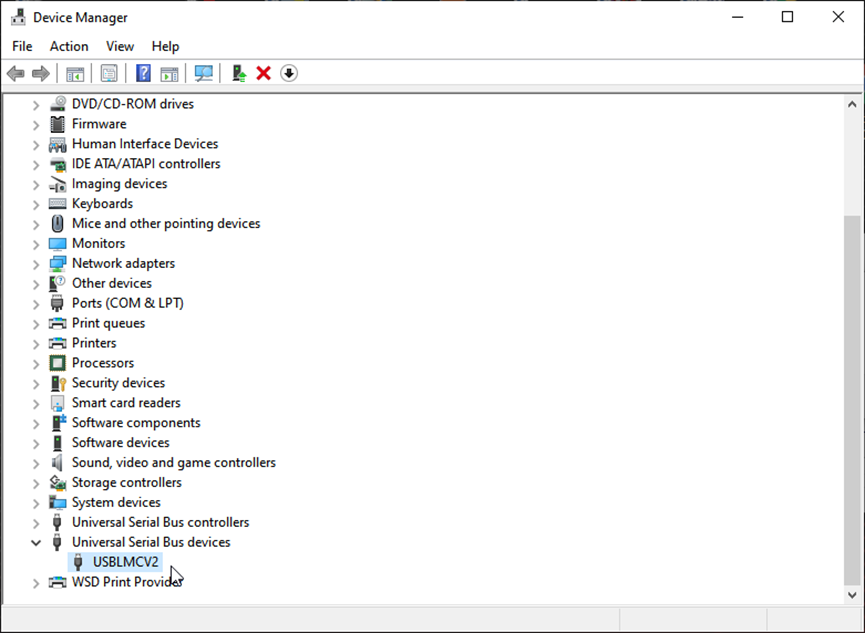
Open your Windows Device Manager — You can do this by clicking ‘Start’ and typing ‘Device’ and letting it auto-complete.

Next, find the USBLMC device in the list — it should be near the bottom, under ‘Universal Serial Bus devices’, shown below:
Right-Click the device and choose ‘Uninstall Device’ from the pop-up menu.

In the next window, check the box to delete the driver. (this doesn’t actually delete anything from your system, it just completely dis-associates the driver from this device)

Click the ‘Uninstall’ button. The process should finish quickly.
If you power off the laser and power it back on, Windows will reconnect, realize that it already has a driver for this device (the old LMC driver) and it’ll appear in the Devices list again, near the top, as a BJJCZ device. That’s it — You can use EZCAD again.

Reference & Resource:
LightBurn Installation Guide: https://docs.lightburnsoftware.com/index.html
How to Install LightBurn for Galvo, Drivers and Device Setup https://youtu.be/9e2dHOaqfU0
LightBurn Galvo Laser First Time Set Up: https://youtu.be/YbzSO20bSuA
Switching Back to EzCad2 From LightBurn: https://youtu.be/J7nsXEUQ1_8
Install EZCAD for your EM-Smart laser: https://youtu.be/B2Rg-mNJpLo
How to Install DRIVERS for Ezcad 2 or Ezcad 3 https://youtu.be/_UgMvws0PZo
